|
|
An article from the May 2012 Journal of Light Construction. The Journal of Light Construction is one of the most well respected trade journals in the industry. Interesting, affordable concept. I will share part two when it comes out next month.
An Affordable Passive House
This airtight, superinsulated home was built using familiar methods and materials
by Chris Corson
[Editor's note: This is the first part of a two-part story; it provides a background on Passive House, a project overview, and a description of the foundation and structural wall framing. Next month the story will continue with completion of the wall and roof framing, air-sealing, insulation, mechanicals, and finishes.]
I've been working in construction since I was a kid. I've worked on job sites in New York, Florida, California, Massachusetts, and Maine, where I now run my own company. Along the way, I've managed more than a few big expensive projects, but none of them was as satisfying as the work I'm doing now - designing and building affordable houses to the Passive House standard, arguably the most stringent energy-efficiency building spec in the world.
The big-picture goal of the Passive House movement is to nearly eliminate housing's share of climate change by slashing energy consumption to about 6 percent of that used in conventional homes (see "Meeting and Beating the Metrics," page 7). But to have a practical effect, the standard can't just apply to high-end projects with big budgets; it has to be within reach of ordinary working people. That's why I jumped at the chance to build a 1,600-square-foot two-bedroom Passive House in Knox, Maine, for a young working couple with a $210,000 budget.
I've taken the nine-day Passive House training course, where I also learned to use the Passive House Planning Package (PHPP), an energy-modeling software that determines whether a house will comply with the standard. For my first Passive House, I wanted not only to hit the performance targets but to build affordably, using methods familiar to any capable builder and readily available materials and products.
Hitting the Goal
To achieve the Passive House goals, we had to superinsulate every assembly on all sides of the house - foundation, walls, roof. The 8-inch foundation sits on a foot-thick polystyrene insulated-form system (see Figure 1). The walls are "hybrid" assemblies, with an inner 2x4 bearing wall and a foot-thick outer structure built with wood I-joists and insulated with dense-pack cellulose. The conventional vented-attic truss roof has a 2-foot raised heel to accommodate deep-blown cellulose.
|
|

|
|
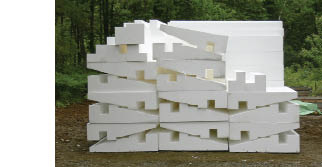
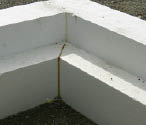
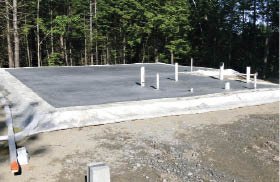
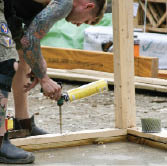
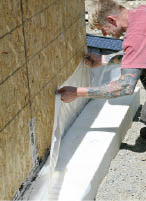
Figure 1. Custom-manufactured polystyrene served as the form system for the home's 8-inch reinforced "raft slab." The pieces were factory-cut with interlocking profiles (A) and a taper that serves as a draining wing insulation (B). The crew assembled the insulated forms on site using PUR Stick adhesive (C, D). A carefully compacted bed of crushed stone provided a flat sub-base for the insulation directly under the slab (E).We also had to eliminate thermal bridging where these building elements meet, which we did by extending the exterior insulation to cover the ends of framing at joints and intersections.
And, finally, we had to make sure that the entire building envelope was meticulously air-sealed (see illustration).
All of these steps made the house completely airtight, so we installed a high-performance energy-recovery ventilator. This unit provides fresh air with minimal heat loss (or summertime heat gain) and very low operating energy consumption (21 watts). It also mixes the house air, distributing solar gains around the living space and maintaining a consistent living environment.
We were able to take care of the house's heating and cooling needs with a small, 13,600-Btu/hr heat pump, bought from a local distributor for $1,500. For backup, we distributed about 15 feet of electric resistance baseboard around the rooms. The electric heat won't run unless the heat pump breaks down - but if it does, those 15 feet should keep the whole house comfortably warm even on the coldest nights.
Foundation
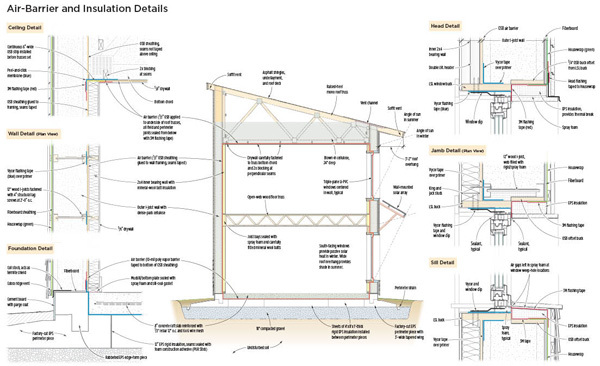
The foundation for this house is an 8-inch-thick concrete "raft slab" resting on 12 inches of high-density (2 pounds per cubic foot) GeoFoam Type 9 structural expanded polystyrene (EPS). The slab is reinforced with half-inch rebar (spaced at 1 foot on-center) plus 6-inch wire mesh. A 3-foot polystyrene wing extends horizontally around it at grade for frost protection.
In Europe, insulated raft slabs are common, especially for commercial buildings, and you can buy off-the-shelf prefabricated insulating form systems much like the one we created. But there's nothing like that on the U.S. market, so we designed our subslab form system in CAD and sent the shop drawings to Branch River Plastics in Smithfield, R.I.
The underslab sections are simple 1x4x8-foot sheets, but the wing pieces for the perimeter were factory-cut with a 3-foot taper for drainage, and have a dado to accept 12-inch-by-14-inch edge-form pieces. Branch River precut most of the parts for us on their CNC equipment, and we did the rest - including the corner cuts at the miters in the wing insulation - in the field with a hot wire.
The sub-base for the raft slab is business as usual - 18 inches of one-inch-minus crushed stone, placed in 6-inch lifts and compacted to 95 percent. I did insist that my contractor level the stone base to within 1⁄8 inch, which he was able to do by spending a little extra time. That flat, even sub-base made it easy for my crew to set and join the foam blocks accurately.
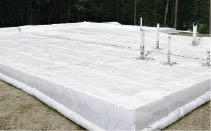
We joined all our foam pieces at the seams with PUR Stick, a polyurethane gun-foam insulating adhesive from Todol (todol.com), which the manufacturer assured me would bond well and last indefinitely in this use. I have tested it out informally at my shop, gluing different things together and leaving them out in the weather for six to eight months, so I am reasonably confident in its performance.
On top of the foam, we placed 10-mil poly to act as the air and vapor barrier and capillary break (Figure 2). We sealed all the joints and penetrations with 3M 8067 flashing tape (3m.com), which is air- and vapor-tight, flexible, and tenacious. Later, we would fold the subslab membrane up at the edges and seal it to the wall to perfect the air barrier at that joint.
|
|
|
|
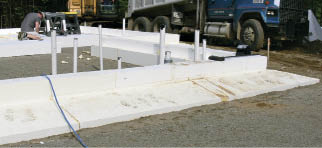
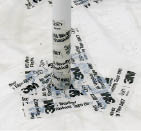
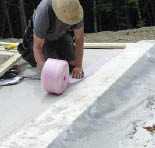
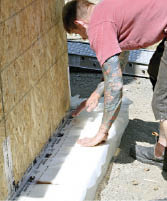
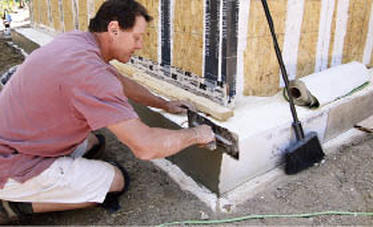
Figure 2. A sheet of 10-mil poly, which acts as an air and vapor barrier and a capillary break, was laid on top of the EPS (A); all seams and penetrations were sealed with 3M flashing tape (B). Steel rebar and wire mesh were supported on dobies cut from insulation scraps (C). Because it is also the finished floor, the slab was meticulously power-troweled smooth and flat (D).
With the foam forms under it, the slab is insulated to R-54. I had originally planned on R-38, but as I worked with the numbers, I realized that the thicker foam would cost just $800 more, so I went for it. As I see it, you'll never get another chance to insulate under the slab, and it's a great place to "hide" insulation.
Still, it was expensive. In fact, the only reason we could afford it was because I bought the EPS foam direct from the factory - and even then it came out to almost $8 per square foot. I have about $5,000 in foam under this home's foundation. But there were also some real savings as a result. Two carpenters cut and placed all the foam (as well as the 10-mil poly) in two days - so with 32 hours of labor, we had the slab formed and ready to pour, and all the insulation and vapor barrier installed. I only had to pay the concrete contractor for placing the steel and concrete.
Incidentally, my concrete guys were extremely skeptical when I first started explaining the system to them. They were worried about bracing the foam, and they expected the job to be complicated. But when the crew got there, the foreman called the office on his cellphone and said, "This is going to be a breeze" - and it was. So across the board, labor savings offset a lot of the material cost of our combined insulation and forming system.
Another cost-saving step was to use the slab surface as the finished first floor. I made sure the installers power-troweled the concrete for hours, making it very smooth and flat. We also let it cure for three weeks before we came back to start framing the walls. Then we sealed the slab with a zero-VOC soy-based penetrating clear sealer called Acri-Soy (ecoprocote.com).
|
|
|
|
Figure 3. To protect the poly air barrier, the crew rolled out sill seal (A) before standing the conventionally framed inner 2x4 support walls (B). The walls were anchored to the slab (C), and the drilled holes sealed with spray foam (D).
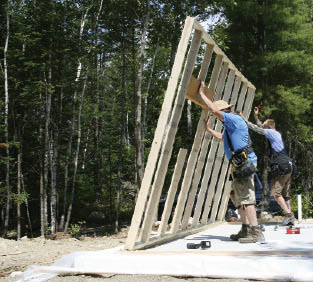
Hybrid Double-Wall Framing
The exterior wall design we used came to me via Katrin Klingenberg, the director of Passive House Institute U.S. (passivehouse .us). When Katrin showed me the design, I liked it immediately because it solves so many problems at once. It's practical to assemble on site within the construction sequence; and all the materials, tools, and fasteners are conventional stuff you'd find on any job. Making the assembly airtight is simple - you just tape every crack on the load-bearing inner wall sheathing. The outer I-joist layer virtually eliminates thermal bridging, both in the field of the wall and at intersections. For me, it's a textbook example of how to build a vapor-open, airtight, R-60 wall without having to resort to spray polyurethane foams.
|
|
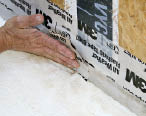
Figure 4. After pulling back the poly vapor barrier, the crew installed the OSB sheathing over beads of spray foam.
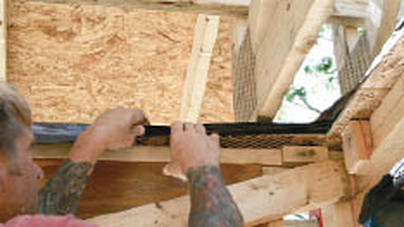
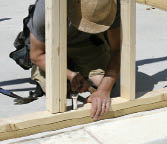
Step one was just to frame a conventional 2x4 house - load-bearing first-floor walls (Figure 3), open-joist second-floor deck, second-floor walls, and a truss-built shed roof. We used PUR Stick to glue the sheathing to the walls, just for added tightness (Figure 4), but the key Passive House detail was to seal all the OSB seams with 3M 8067 flashing tape (Figure 5). Where I intended to fasten the wood I-joists for the outside wall, we applied Vycor modified-bitumen flashing tape over primer to ensure that the fasteners would self-seal (Figure 6). Once this house was finished, I knew there would be no way to access and repair any of the joint-sealing tape - and I wanted to improve the odds that the joints and screw penetrations will remain airtight over a century or more of service, even if the wood shrinks or moves and the house settles.
|
|
|
|
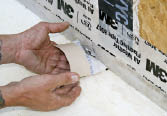
Figure 5. To make a tight seal between the subslab poly barrier and the sheathing, the author first taped the corner of the plastic sheet to the OSB (A), then folded it up onto the wall (B). The edge of the plastic sheet was continuously taped, and all holes carefully sealed (C,D).
|
|
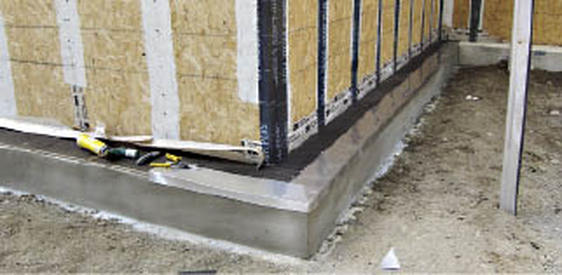
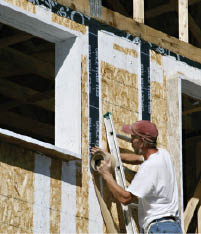
Figure 6. Sealing the sheathing with flashing tape created the building's airtight envelope (A). The exposed outer face of the forms was protected with Durock and a cementitious parge (B); its top was covered with asphalt-coated fiberboard sheathing and aluminum flashing (C).